
Configure Data for Export to Your EVV Provider
Before data can be successfully exported to your Electronic Visit Verification (EVV) provider, the required EVV information must be configured in Celayix.
Dedicated EVV sections are available for Employees, Clients, and Services, allowing you to store the information required by your EVV provider separately from other Celayix reference data.
This article explains where to locate these sections and how to prepare your data for export.
Important: At present, Celayix supports EVV data transfers to Sandata only.
Before You Begin
Before configuring EVV data, contact Celayix Support to enable EVV functionality for your account.
EVV requirements can vary by state and EVV provider. Once EVV has been enabled, confirm the requirements for the state in which services are being provided and ensure you have the required identifiers and information for your:
- Employees
- Clients
- Services
Fields marked with an asterisk (*) are required and must be completed before the applicable record can be successfully exported to your EVV provider.
Enable EVV Tabs
Once EVV functionality has been enabled for your account, you can make the EVV tab visible within the applicable Employee, Client, and Service profiles.
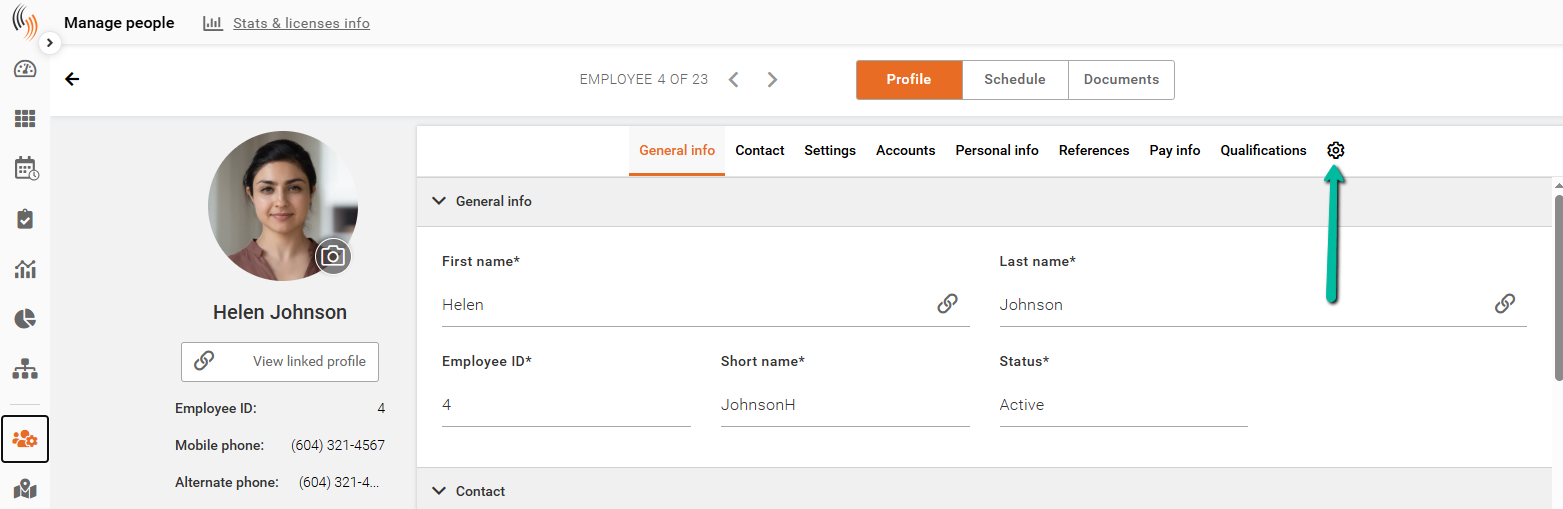
Open Form Settings
- Go to the applicable Employees, Clients, or Services section in Schedule Xpress.
- Open any record.
- Click the Settings cog located beside the profile tabs.
Enable the EVV Tab
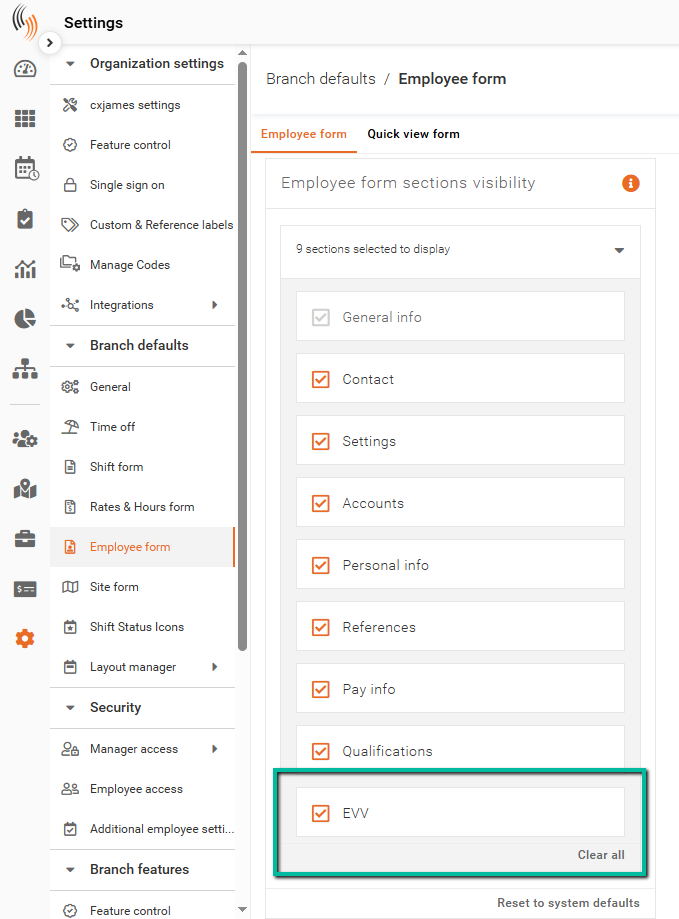
- In Form Sections Visibility, locate EVV.
- Select EVV to make the section visible.
- Click the X in the top right corner to exit and save changes.
Tip: Once enabled, the EVV tab will appear within the applicable profile, allowing you to enter the information required for your EVV provider.
Configure Employee EVV Information
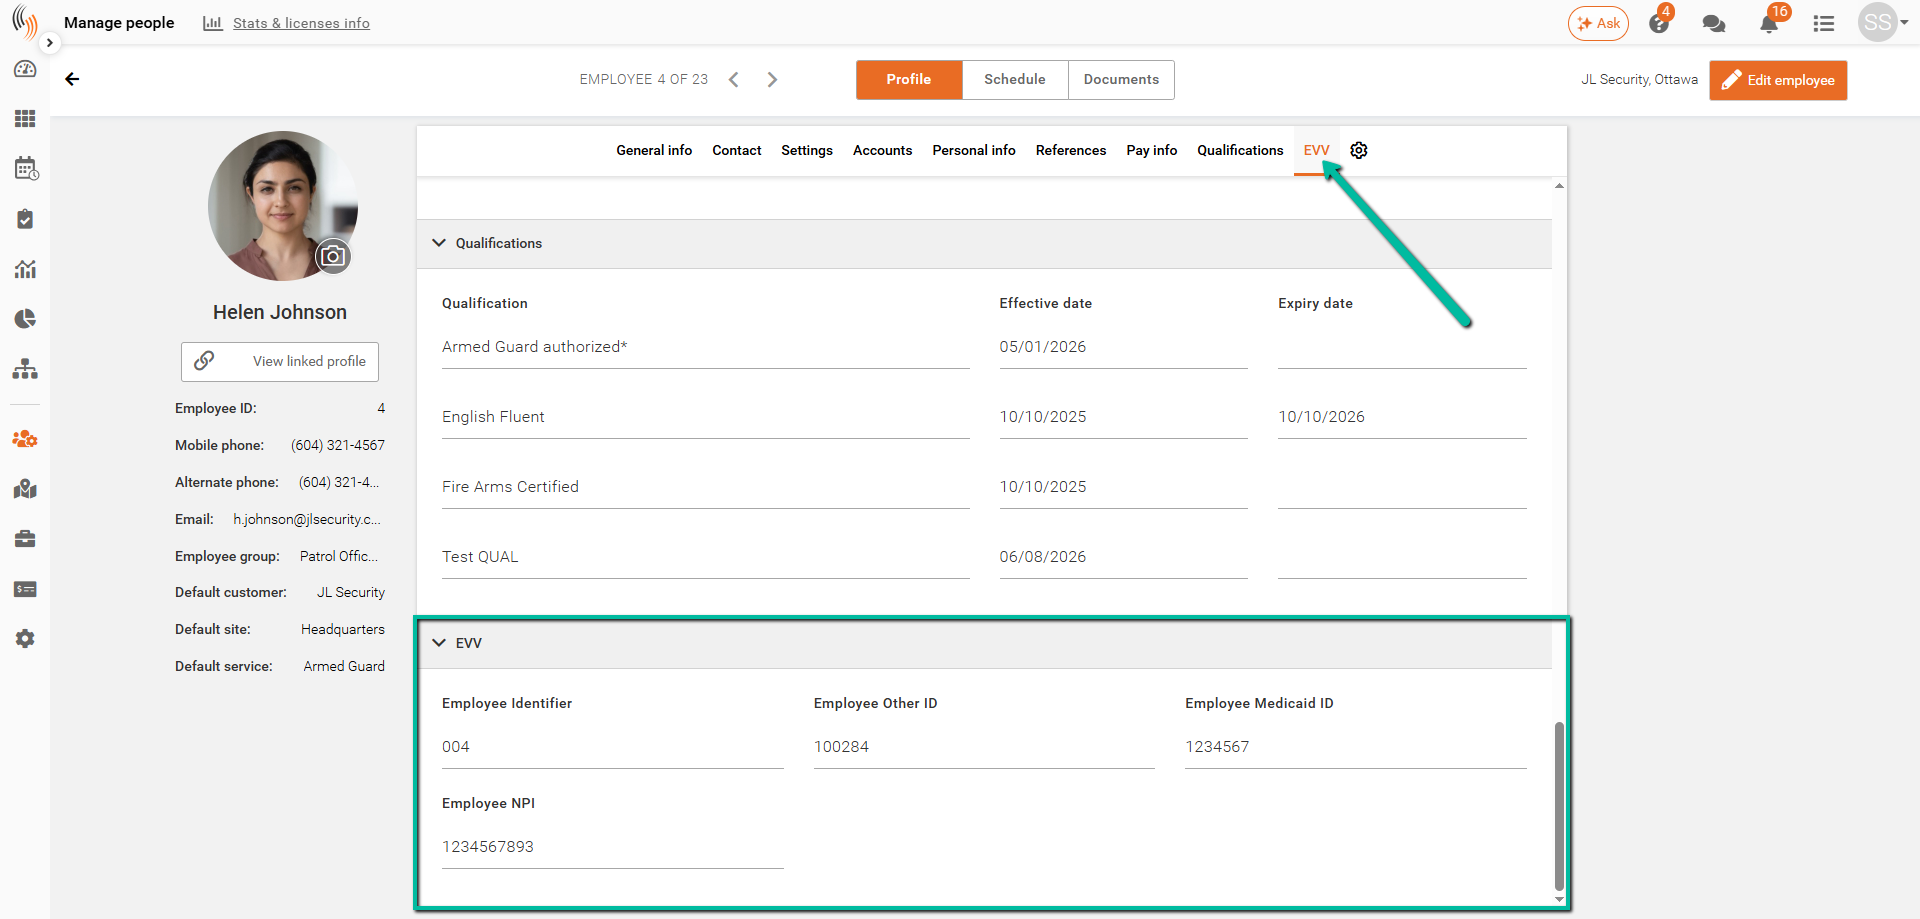
EVV information for each Employee is stored in the EVV section of their Employee profile.
Add EVV Information
- Go to Schedule Xpress > Employees.
- Search for and open the applicable Employee.
- Select the EVV tab.
- Enter the applicable EVV information.
- Click Save.
Employee EVV Fields
Depending on your state and EVV provider, the information you need to enter may include:
- Employee Identifier – The identifier used to identify the employee for EVV purposes.
- Employee Other ID – An additional identifier associated with the employee, where required.
- Employee Medicaid ID – The employee’s Medicaid identifier, where applicable.
- Employee NPI – The employee’s National Provider Identifier (NPI), where applicable.
Important: EVV requirements vary by state and EVV provider. Complete the fields required for your organization's specific EVV configuration.
Configure Client EVV Information
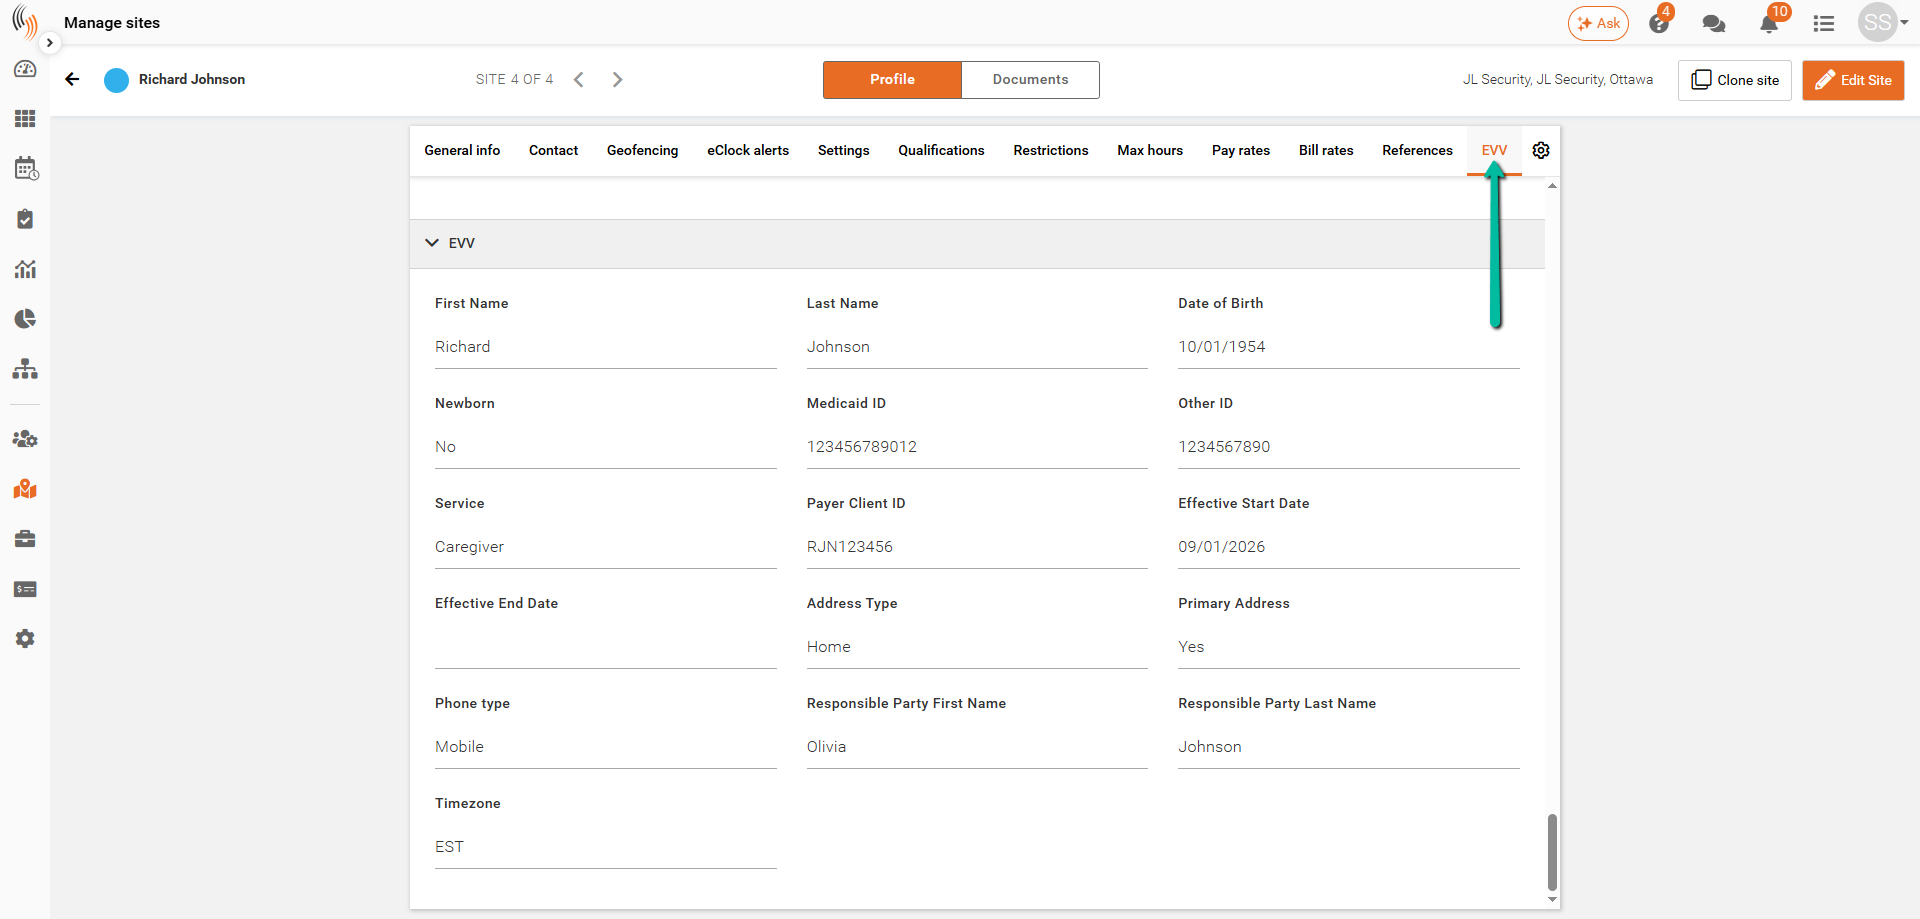
EVV information for each Client is stored in the EVV section of their Client profile.
Add EVV Information
- Search for and open the applicable Client.
- Select the EVV tab.
- Enter the applicable EVV information.
- Click Save.
Client EVV Fields
Depending on your state and EVV provider, the information you need to enter may include:
- First Name and Last Name – The Client’s first and last name as required by the EVV provider.
- Date of Birth – The Client’s date of birth.
- Newborn – Indicates whether the Client is a newborn.
- Medicaid ID – The Client’s Medicaid identifier.
- Other ID – An additional identifier associated with the Client, where required.
- Service – The service associated with the Client for EVV purposes.
- Payer Client ID – The identifier assigned to the Client by the applicable payer.
- Effective Start Date and Effective End Date – The date range during which the Client’s EVV information is effective.
- Address Type and Primary Address – Identifies the type of address and whether it is the Client’s primary address.
- Phone Type – Identifies the type of phone number associated with the Client.
- Responsible Party First Name and Last Name – The name of the person responsible for the Client, where applicable.
- Timezone – The timezone associated with the Client.
Important: EVV requirements vary by state and EVV provider. Complete the fields required for your organization's specific EVV configuration.
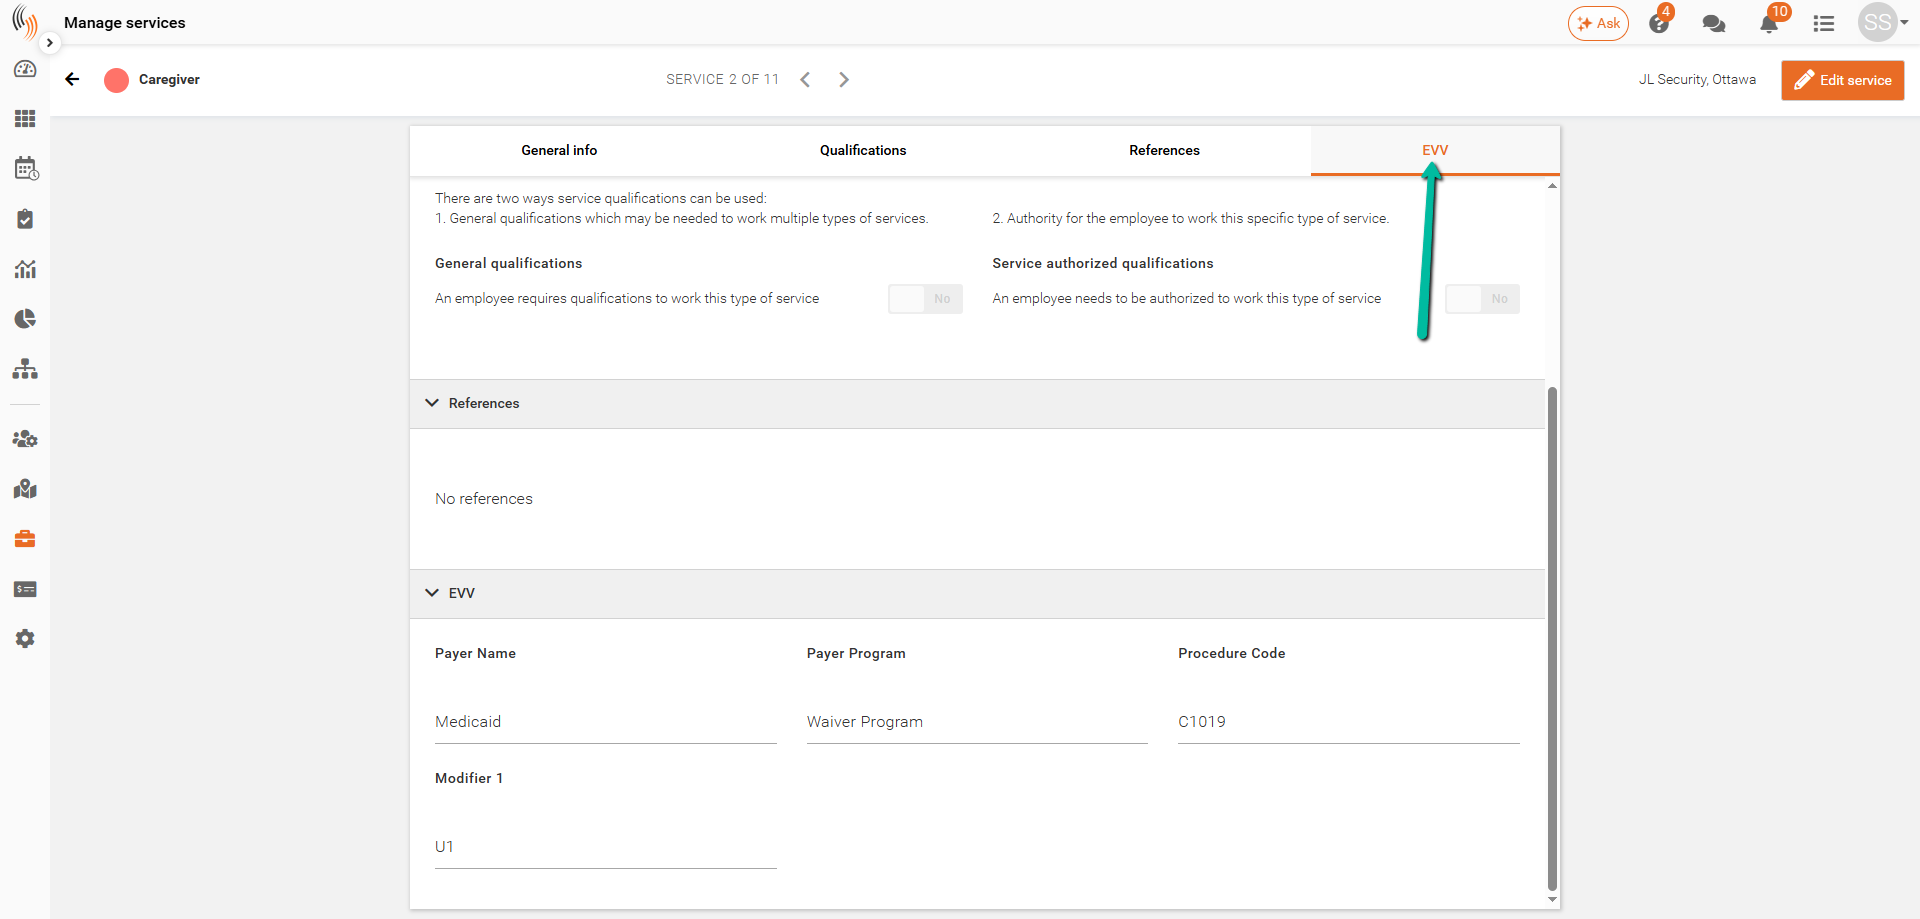
Configure Service EVV Information
EVV information for each Service is stored in the EVV section of the Service profile.
Add EVV Information
- Go to Schedule Xpress > Services.
- Search for and open the applicable Service.
- Select the EVV tab.
- Enter the applicable EVV information.
- Click Save.
Service EVV Fields
Depending on your state and EVV provider, you may need to enter the following information:
- Payer Name – The name of the payer associated with the service.
- Payer Program – The program under which the service is provided.
- Procedure Code – The procedure or service code recognized by your EVV provider.
- Modifier – An additional code used with the Procedure Code to further identify or define the service being provided.
Important: Fields marked with an asterisk (*) are required. The information required for EVV can vary by state, payer, and EVV provider. Confirm the appropriate values before configuring your Services.
Review Your EVV Data
Before exporting data to your EVV provider, review your configuration and confirm that:
- Required EVV fields are populated for applicable Employees.
- Required EVV fields are populated for applicable Clients.
- Required EVV fields are populated for applicable Services.
- Identifiers match the corresponding records in your EVV provider.
- Information has been saved correctly in each record.
Important: Incorrect or missing EVV information may prevent records from being successfully exported or matched with the corresponding records in your EVV provider.
Next Steps
Once your EVV data has been configured, you are ready to proceed with the EVV export process.
For information on sending your configured data, see Export Data to Your EVV Provider.
If you need assistance enabling or configuring EVV functionality in Celayix, contact Celayix Support.